You enable the WR tool by clicking on its icon in the toolbar:

When the WR tool is active, the lower portion of the sidebar is occupied with a set of controls which allows you to interact with the WR system.
Most of the weather routing configuration is done in two areas: the configuration area in the sidebar and through the tool menu. This page describes the configuration area:
Download this site!
Note that the routing.luckgrib.com title is actually a button. The first time you click that button, a dialogue will appear offering to download this site. If you do that, then you can then click the button at any time, even offshore while away from wi-fi, and continue reading.
As an added bonus, you can also search through the site content when it is being read locally.
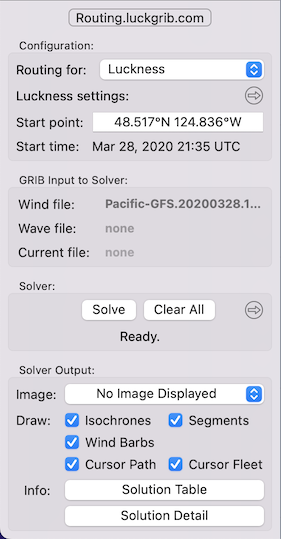
Routing for:
The system creates weather routing solutions for vessels, and multiple vessels can be created in the system. The menu associated with the Routing for: button allows you to choose which vessel you are working with.
You can change the vessel at any time. Any previously created weather routing solutions for a vessel will remain when you switch vessels. This allows you to solve for one vessel, switch to a new vessel and solve again. After solving for two, or more, vessels the generated paths can be compared to each other.
If a vessel has had its visibility toggled off, it will not appear in this menu.
Vessel settings:
The second line changes its name according to the vessel that has been selected. Clicking on the reveal button to the right of this label opens the vessel settings editor. This is the editor which allows you to edit all of the settings associated with a vessel.
Example vessel settings are: starting point, vessel performance, tack/jibe penalty and many more.
Start point.
This editor allows you to type in the exact starting point for the weather routing solution, if you know what it is. You can also create the start point using the tool menu and dragging the point around the screen, or by creating a position report.
Starting time.
The current starting time is shown. To change the starting time, use the tool menu.
GRIB input to solver.
These are the GRIB files which will be used when the solver is next run. Note that the files reported in this area are not necessarily the files associated with a selected solution path.
There are three buttons in this area. If one of the three GRIB file types has an associated value, the button label will show the filename. Clicking on the button will select the file (allowing you to view the wind, wave or current file.)
If multiple wind files are being used by the solver, the wind button will show Multiple and clicking on it will bring up a menu with the files to choose from.
Solve.
Clicking on the Solve button runs the weather routing solver. If this button is enabled, the system has enough input for the solver to run. If this button is not enabled, there should be a message displayed with a hint as to what is missing.
Clear all.
While the solver is running, the Clear all button will be named Halt. Pressing the Halt button will stop the solver and present any partially completed results.
When the solver isn’t running, the button is named Clear all and pressing it will remove all weather routing solutions.
Logfile button.
The reveal button to the right of the Clear all button will bring up a logfile. The logfile may contain helpful messages, from time to time. If the solver has done something surprising to you, it may be worthwhile looking in this area.
Examples of messages you may find here are:
- an input solution being ignored due to it not being necessary (for example, the pure sailing variant of a solution if the motoring variant did not use the motor.)
- if a solution did not arrive at the target, the logfile may report that the system ran out of forecast data.
- performance of the system.
Solver message.
The message shown below the Solve button will change from time to time, according to what the system deems important.
Image:
The menu to the right of the Image label allows you to choose one of the analysis image types. See the Evaluating results section for more details.
Draw:
The check buttons to the right of the Draw label turn on and off various elements that can be drawn.
Solution Table, Solution Detail.
These two buttons bring up corresponding windows that allows you to view and interact with either the entire collection of solutions present in the system, or to view details on the selected solution.