There are a variety of menus which can appear, according to whether or not there is a solution path currently selected and what you click on.
The main menu is brought up simply by clicking down on empty space in the main view. (More precisely, clicking down anywhere other than a path, start point or target point.)
There are also three menus specific to each of: the selected path, the start point and the target point. You can bring up these item specific menus with one of three methods:
- double click on the item (path, start point, target point.)
- hold down the control key and click on the item.
- perform the right click action, which is a track pad two finger press.
Main menu.
An example of the main menu is:
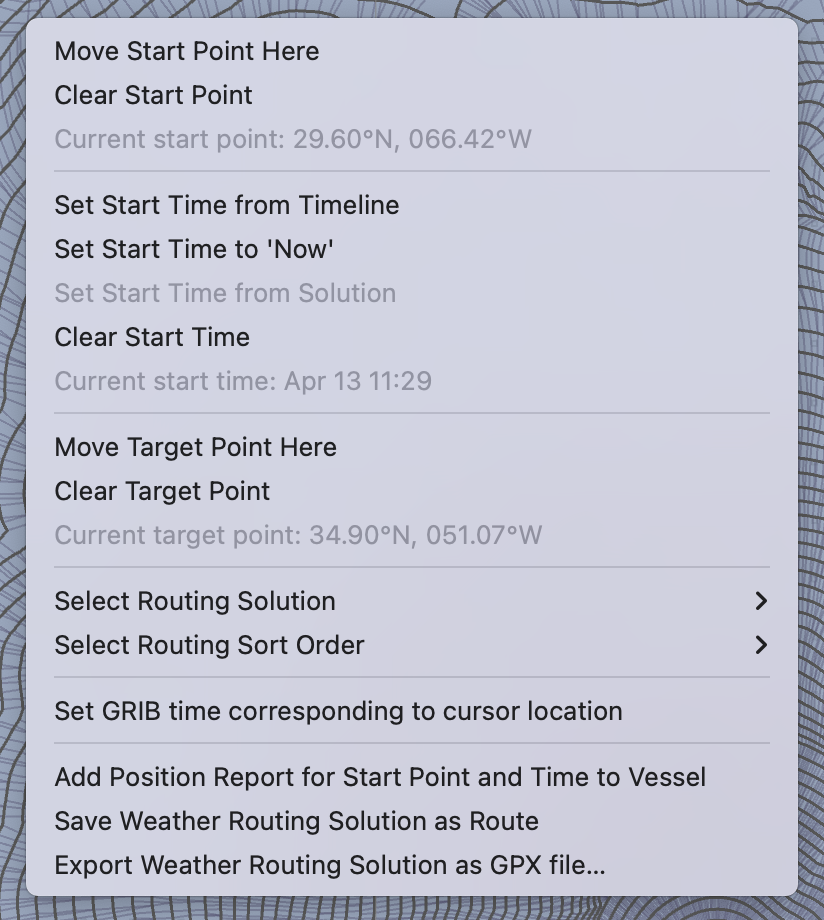
Start point.
The first three menu items are related to the location of the start point for the solver. If you select the first item, Move start point here, then the starting point is moved to where you first clicked down. Note that you can further adjust the location by clicking on the point and dragging it.
You can also clear the start point. If your vessel has position report, if there is no start point set, then the last position report (position and time) are used by the solver.
By setting a start point you override the last position reports position.
Start time.
Similar to the start point, if a start time is set, then it is used in preference to the final position report for the vessel.
You have the option of setting the start time using the GRIB timeline, from the currently selected path, or to the current time of day (now.)
Setting the start time from the currently selected path is useful when doing departure planning. If you have a preference for one of the departures, you can use it as your new start time.
If a start time has been set, but you would like to use the time from the last position report, the start time can be cleared.
Target point.
The target point may not be the final point for your passage. If you are on a long passage, the target point may be an intermediate point, a short term target. (This is why the point is called the target and not end point.)
The target point is optional. If you do not provide a target point, the solver will generate a full set of isochrones, using all of the available forecast time to expand as far as possible.
If you do provide a target point, the solver modifies its behavior to generate a more detailed path as the target point is approached.
Select routing solution.
This brings up a menu listing all of the routing solutions. This is a quick way to select a solution by name. It is also useful when there is no target point set, but more than one solution was generated. In this later case, there is nothing to click on, so an easy way to switch between the solutions is via this menu.
Select routing sort order.
This submenu allows you to choose among a few different orders for the solutions shown in the routing solution submenu (discussed above.)
Set GRIB time corresponding to cursor location.
When exploring a solution space generated, you may want to view the GRIB file content corresponding to an arbitrary point in the solution space. If the point is along the solution path, you can simply click and drag on the path. However, if the point is far away from the path, you can click down in the region and select this menu item to modify the GRIB time accordingly.
Add position report.
If you have created a new start point and start time, which corresponds to where your vessel is currently located, you can use that information to create a position report for the vessel.
Depending on how you choose to work with the system, position reports can be generated before interacting with the weather routing system, afterwards, or not at all.
Save weather routing solution as route.
This menu item will convert the selected solution path to a special form of route. These routes can be accumulated in order to compare the evolution of a WR solution over many forecasts.
There is more detail here.
Export weather routing solution as GPX file.
This menu item will export the selected weather routing path as a GPX file. A dialogue will appear, allowing you to choose the exported files name and location.
Item specific menus.
The menus which appear when you double click on the start point, target point or selected route mainly contain a suitable subset of the items from the main menu, discussed above.