The tool has six buttons, three of which have associated menus. These menus are used to configure more of the weather routing settings, as well as evaluate and generate output of the results.
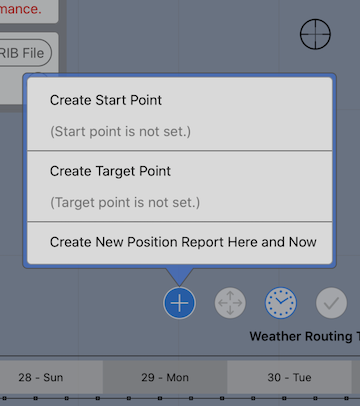
Create start point.
To set the start point for the generated weather route, you can either set a start point, or use a position report. Position reports are discussed in more detail, later. If you set a start point, it will override the location of last position reports, if present.
If you want to start the route at your current vessel position, and your device has a built in GPS, you can tap the location button to the left of the latitude / longitude information showing in the window. This will cause the map to scroll over to your current location and you can then create, or move, the start point there.
If your device does not have a built in GPS, but you know your location from some other onboard GPS, you can enter the latitude / longitude manually, by tapping on the latitude / longitude information text shown, and then entering the new location:
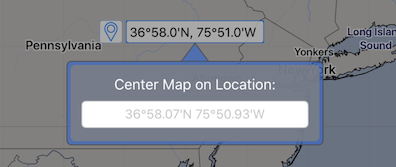
Note that you can simply type in the latitude, longitude, no need for the symbols or the N / S / E / W signifiers, if you are in the same region of the world as is shown on the map. One example of typical input would be:
36 55 75 46
Signifying 36 degrees, 55 minutes of latitude, 75 degrees, 46 minutes of longitude, and the N / S / E / W indicators set according to the current view.
Clear start point.
Once the starting point has been set, the points menu will contain an item that allows you to clear it. If your vessel has position reports, and there is no start point set, then the last position report location is used as the starting point.
Create target point.
The target point may not be the final point for your passage. If you are on a long passage, the target point may be an intermediate point, a short term target. (This is why the point is called the target and not end point.)
The target point is optional. If you do not provide a target point, the solver will generate a full set of isochrones, using all of the available forecast time to expand as far as possible.
If you do provide a target point, the solver modifies its behavior to generate a more detailed path as the target point is approached.
Similar to how the start point is set, pan and zoom the map so that the cursor is located at the point you want, and then tap this menu item to set the target point.
Clear target point.
Once the target point has been set, the points menu will contain an item that allows you to clear it.
Create position report.
A position report contains both a location and the time you were there. Position reports can be used as both the starting point and time by the weather routing solver. If you are sailing a passage, it is often useful to create a track for where you have been. A track can give valuable (and entertaining) context to your passage.
One way of working with the WR system, is to frequently download new weather data and update your weather routes based on where you are, with the fresh forecasts. An easy way of doing this, is to first create a position report for where you are, then download new weather data, using the visual location of your position as context when defining a weather download region. After the download has finished, update the weather routes. Using position reports makes this workflow easier.
To create a position report, first position the map on your current location (using the built in GPS or by typing in the location using the latitude / longitude input described above.) Once the map is centered on your location, tap the create position report button in the points menu, and a new vessel icon will appear under the cursor.
If you are creating position reports to keep track of your vessels location, there will be no need to set a start time, as that information is encapsulated in the position report.
If you set a start time, it will override the time in a position report. If you are not creating position reports, setting a start time will be required.
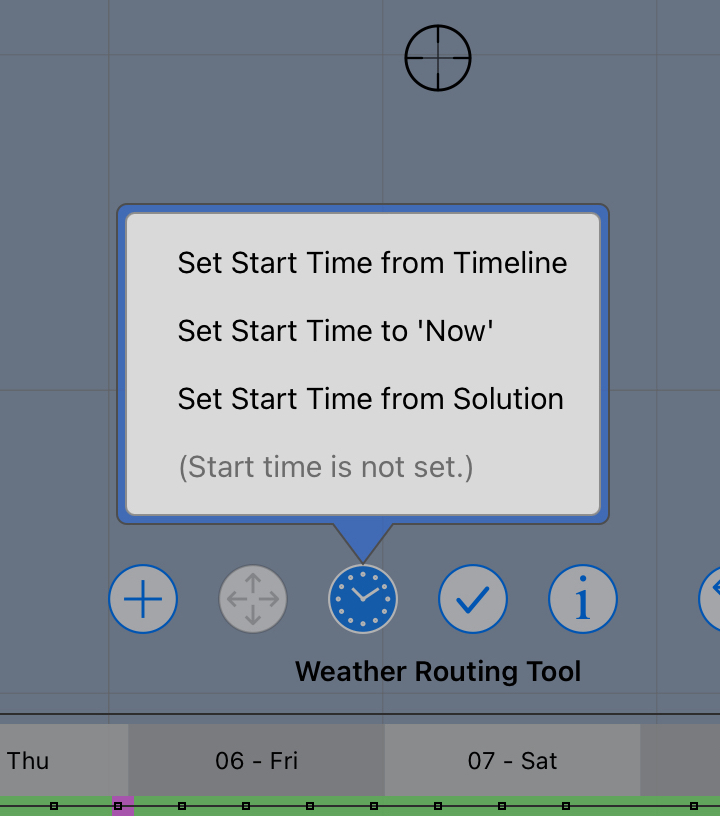
Start time.
You have the option of setting the start time using the GRIB timeline, from the currently selected path, or to the current time of day (now.)
Setting the start time from the currently selected path is useful when doing departure planning. If you have a preference for one of the departures, you can use it as your new start time.
Clear start time.
If a start time has been set, but you would like to use the time from the last position report, the start time can be cleared.
Set GRIB time corresponding to cursor location.
If a weather routing solution has been generated, and the cursor is in the solution space, then a menu item will be present which allows you to set the GRIB time corresponding to where the cursor is in the space.

GRIB input to solver.
The top items in this menu indicate which GRIB files which will be used when the solver when it is next run. Note that the files reported in this area are not necessarily the files associated with a selected solution path.
If you tap on any of these GRIB buttons, the file will be selected, allowing you to view the wind, wave or current file.
If multiple wind files are being used by the solver, there will be more than one wind file present in the menu.
Save weather routing solution as route.
This menu item will convert the selected solution path to a special form of route. These routes can be accumulated in order to compare the evolution of a WR solution over many forecasts.
There is more detail here.
Export weather routing solution as GPX file.
This menu item will export the selected weather routing path as a GPX file. A dialogue will appear, allowing you to choose the exported files name and location.
Solution Table.
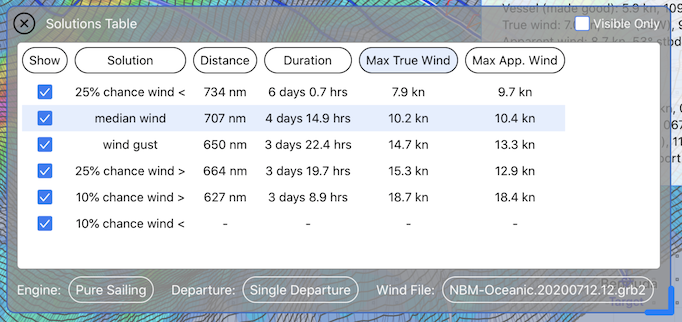
The solution details view is a useful way to evaluate a family of solutions. More than one solution may be generated when working with files containing more than one wind field. Examples of this are files containing both 10m wind and wind gust, along with ensemble and probability wind files.
Tapping on any row will select that solution. You can also tap on the button in the table header to sort the table on that field.
Tap on the button in the show column to show or hide that solution.
You can examine categories of solutions by choosing among the menus available on the buttons at the bottom of the window. This can be used, for example, to view all of the solutions from a single departure, or only the solutions which are pure sailing routes (without motoring.)
Solution Detail.
The solution details report contains a lot of information about the selected weather routing path.
A sample report is available here.
Solver logfile.
The solver logfile may contain helpful messages, from time to time. If the solver has done something surprising to you, it may be worthwhile looking in this area.
Examples of messages you may find here are:
- an input solution being ignored due to it not being necessary (for example, the pure sailing variant of a solution if the motoring variant did not use the motor.)
- if a solution did not arrive at the target, the logfile may report that the system ran out of forecast data.
- performance of the system.