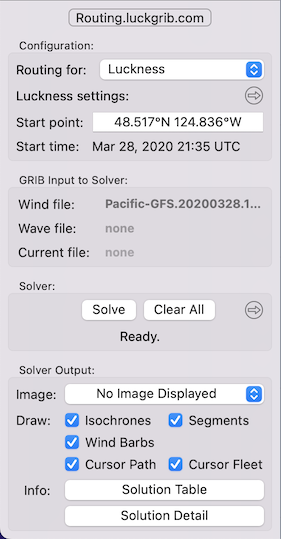
The four major components of this system are:
- Configuration. There are many configuration settings, although at least initially, many of them can be ignored, as you learn the system. Two pieces of essential information are the starting point and starting time for the weather route.
- GRIB input. You provide GRIB data which describes wind forecasts, ocean current and wave height data. Only the wind data is required. (In addition, multiple wind forecast files can be provided - although this is left as a future, more advanced topic, discussed in the manual.)
- Running the solver.
- Analysing the output. There are many ways to examine what the solver has generated.
Switching modes.
To start working with the weather routing system, you need to choose the weather routing tool, by clicking on the icon on the right of the tools group:

When you do that, the sidebar on the left will display new content. Normally the sidebar is split into two, with the top being the list of files available and the bottom being the list of draw presets that are used to visualize the GRIB files in different ways.
When you invoke the weather routing tool, the bottom area of the sidebar becomes something like this:

The tool is described in more detail in its own section.
Vessels.
Another major component of this system is how the weather routing solver interacts with vessels. The first control in the Weather Routing pane is a popup menu that allows you to select a vessel. In this case, a vessel named Luckness has been selected. Below that popup menu is a settings button which provides access to all of the weather routing configuration settings.
The settings are described in more detail soon. The system is capable of supporting as many vessels as you want to create. Each vessel can have different performance characteristics, be located in a different part of the world, and each has independent settings which describe to the solver what it wants to accomplish.
Download this site!
Note that there is a button, labelled routing.luckgrib.com, shown in the image above. The first time you click that button, a dialogue will appear offering to download this site. If you do that, then you can then click the button at any time, even offshore while away from wi-fi, and continue reading.
As an added bonus, you can also search through the site content when it is being read locally.
Everything else.
There is quite a lot more to describe. Please read through the other topics in this Getting Started guide for more detail.